Part One: An Overview of Phishing Hacks by Hikvision Senior Director of Cybersecurity

November 5, 2020

Hikvision HikWire blog article Learn to Identify Phishing Attacks

Learn to Identify Phishing Attacks to Stay Safe Online


Being able to identify phishing attacks can reduce your risk of clicking on a malicious link. Phishing attacks have been on the rise in 2020, compounded by cybercriminals taking advantage of the pandemic and the sudden growth of a remote, work-from-home workforce. Below, Hikvision’s senior director of cybersecurity, Chuck Davis, provides an overview of phishing hacks and examples to help you stay safe.

In February 2020, Barracuda networks found a 667 percent rise in coronavirus-driven phishing attacks. From the Barracuda blog: “Between March 1 and March 23, Barracuda Sentinel has detected 467,825 spear-phishing email attacks, and 9,116 of those detections were related to COVID-19, representing about 2 percent of attacks.”

With phishing attacks on the rise, it’s more important than ever to learn how to avoid becoming a victim of this cyberattack. Continue reading to learn more about phishing attacks and how to identify them so you can stay safe online.

What is Phishing?
Phishing attacks have long been an effective way for attackers to trick people into divulging sensitive information or infecting a system with malware. Malware can give an attacker remote access to protected systems and networks, encrypt a user’s data and charge a ransom to decrypt the data, or use that system as part of an attack against other systems. Around since at least 1995, phishing is used to trick people into providing credit card information, login IDs and passwords, and to gain access to your computer, protected systems and/or networks.

Phishing takes many forms and those forms evolve daily. It’s true, some phishing attacks are so good they can even dupe seasoned cybersecurity experts. But, common phishing attacks are easy to detect. And, the more you understand about phishing tactics, the better you get at recognizing when you need to be suspicious and take extra caution.

Examples of Email Phishing with Screenshots
Being able to identify common phishing attacks can make you less prone to clicking on malicious links. Below are two examples of phishing with screenshots to help you understand what to look for.

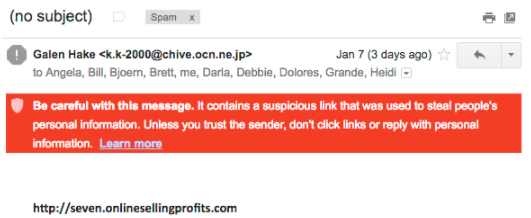
The following is an example of a fairly obvious spam email that Google’s filter caught and placed in the spam folder of a Gmail account. There is no subject line; there is just a link. When Google discovers rogue links, the red box shown in the email below serves as a warning to not click on links or reply with personal information.
Identifying phishing hacks, image 1

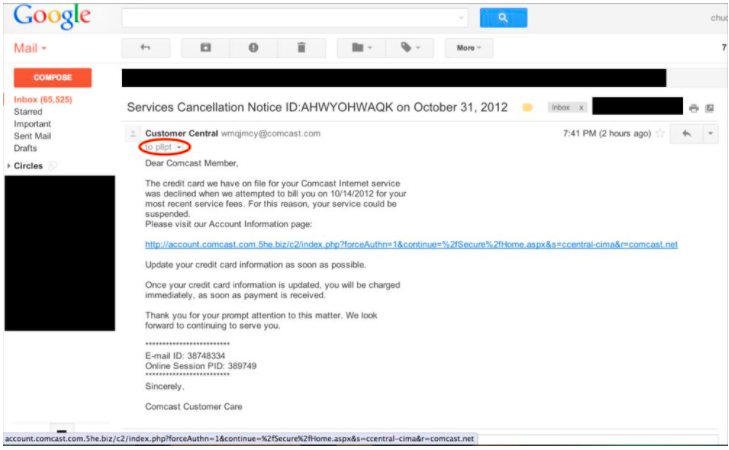
The next example is a phishing email that made it through spam filters. This attack attempted to steal login credentials for the recipient's Comcast account. The following email appears to come from “Customer Central,” an email address using the domain name “comcast.com.” Of course, this was spoofed. The "from" field cannot be trusted in this case and is not actually showing you the source of the email.

By masking the full destination email address, the email also creates heightened security concerns. In the image below, it appears the email was sent to “pllpt.” This is grayed out and in small text. While that could be a mailing list, one would expect something different if it was sent directly from Comcast.
Identifying phishing hacks, image 2

The email indicates that the customer’s credit card information on file has declined the payment, and the email requests that the recipient update his or her credit card information by clicking on the link.

A quick or casual review of this link may make it appear safe since the URL link begins with account.comcast.com. However, when you look at the rest of the URL, you’ll something out of the ordinary: account.comcast.com.5he.biz/.

The last two sections before the forward slash (/) indicate the domain name of the destination. In this case, the domain name is actually 5he.biz. The “account.comcast.com” is all subdomains of 5he.biz.

Interestingly, the author of this phishing email did not try to mask the actual link, which is easy to do and might be a little more effective in tricking someone to click on it.

Other types of email phishing scams include:

  • Masking a URL: This happens when a cybercriminal masks a website link by making it look like the authentic website. But, if you hover over the link you may find it doesn’t actually direct to the URL it shows. Hikvision’s Davis recommends hovering over links before clicking them, or going directly to the verified company website.
     
  • Clickjacking, Advanced URL Masking: Hovering over a URL is a popular and an effective way to scrutinize a URL, but it’s not 100 percent effective. A more advanced phishing attack will use methods like clickjacking. Clickjacking shows that the URL is pointing to one destination address, but takes the user to another address. Clickjacking is done by inserting a small piece of JavaScript behind the URL that directs a user to a specific address when they click. 
     
  • Phishing Websites versus Verified Websites: Inspect URLs with caution as the rogue, malicious website links can be almost identical to the actual, verified company webpage.

Learn more by viewing Hikvision’s “Examples of Phishing Part 2” blog.

Two Ways to Identify Phishing Attacks
While hackers are becoming increasingly skilled at developing well-crafted phishing emails, there are some steps that can be taken to reduce the risk of falling victim to a phishing attack. We’ve outline two ways to identify phishing attacks below.

  1. Look carefully at the email headers: Check the "From" and "To" fields for anything suspicious. While we already stated that these can be spoofed, they can also be a good first indicator of a suspicious email. Here is how to check the full email headers in Gmail: https://support.google.com/mail/answer/29436?hl=en
     
  2. Hover over links and be sure to read the entire URL: When you hover over a link, notice if the website link is different than the listed URL. Also inspect the entire URL from the first forward slash, back to the left, to see where that link is actually going. For example, http://www.google.com.search.us/query.html is actually going to a server called "search.us," not google.com. Again, this can be spoofed in some cases, but it is a good indicator of how phishing links can appear to be sites we trust.

Visit the Hikvision blog tomorrow when we’ll be discussing spear phishing, and other tips to stay safe from malicious hacks. 

IMPORTANT! This model requires non-standard firmware. Do Not Install standard firmware (e.g. v.4.1.xx) on this model. Doing so will permanently damage your system. You must use custom firmware v.4.1.25 from the iDS-9632NXI-I8/16S product page.

View the most updated version of this document here:

https://techsupportca.freshdesk.com/en/support/solutions/articles/17000113531-i-series-nvr-firmware-upgrade-instructions


The I-series NVR (such as the DS-7716NI-I4) is one of Hikvision's most popular and feature-rich recorders. As such, many firmware revisions have been introduced over the years to continually ensure the product is compatible with the newest technology available. Due to the many revisions, we recommend that the user closely follows the instructions below in order to reduce the amount of time spent as well as the chance of failure.


Database Optimization and Repair

As more affordable IP cameras are introduced over time with greater video resolution and data sizes, more efficient database management also becomes necessary. The introduction of firmware v4.0 brought about a new database architecture in order to be futureproof.


After upgrading to v4.X, the recorder database will need to be converted and optimized. If you are experiencing issues where playback is expected but not found, make sure "Database Repair" is performed as indicated in the procedures and scenarios below.


Preparing the Upgrade

Before proceeding with upgrade, it is recommended that NVR configuration file is exported from the NVR over the network or on to a local USB drive.


Upgrading from v3.4.92 build 170518 or Older

  1. All recorders must reach v3.4.92 before proceeding further. Upgrading from versions before v3.4.92 directly to any version of v4.X will likely cause the recorder to fail.
  2. If the recorder is already at v3.4.92, a full factory default is highly recommended before upgrading to any version of v4.X. There is a high chance of unit failure (requiring RMA) if the unit is not defaulted before upgrade.
  3. After reaching v3.4.92 and performing a full factory default, an upgrade directly to v4.50.00 is acceptable.
  4. After the upgrade is completed and the recorder is reprogrammed, it may be beneficial to perform a Database Repair. For details, refer to the section "Database Optimization and Repair" above.
  5. To verify repair progress, you may refer to the HDD status, or search the recorder log for repair started and stopped entries. Note that while the HDD is repairing, new recordings are still being made, but some existing recordings may not be searchable until repair is complete.
  6. If you continue to observe playback issues after database repair, ensure there are no power, network, or motion detection issues. Should the problem persist, contact technical support.


Upgrading from Any v4.X Build to v4.50.00.

  1. Any v4.X build can be upgraded directly to v4.50.00.
  2. Export configuration is highly recommended before performing the upgrade.
  3. If upgrading from any v4.X version that was not v4.22.005, a Database Repair is recommended. Refer to Step 4 and onwards in the previous section.


Downgrading

Downgrading is not recommended. Due to new features and parameters constantly being added, downgrading may cause the NVR to factory default itself or require a manual default to operate properly.

View the most updated version of this document here:
K-Series DVR upgrade instruction
The Turbo 4 Hybrid DVR K series has multiple models and across different platform and chipset. It also has similar firmware development of other recording product line; DVR K series has also introduced the GUI4.0 to ensure the series to be compatible to the newest technology available. The new database architecture is also brought into the DVR firmware v4.0 to be future proof and for better recording search experience. 


Database Optimization and Repair

As more affordable cameras introduced over time with greater video resolution and data sizes, more efficient database management also becomes necessary. The introduction of firmware v4.0 brought about a new database architecture in order to be futureproof.
After upgrading to v4.X, the recorder database will need to be converted and optimize. If you are experiencing issues, where playback is expected but not found, please make sure to perform "Database Rebuild" as indicated in the procedures and scenarios below.


Preparing the Upgrade

Before proceeding with upgrade, it is recommend exporting DVR configuration file from the DVR over the network or on to a local USB drive.


Action after firmware upgraded 

1. Upgrade the DVR according to the chart above. 

2. Reconfirming Channel's Recording Schedule 

    - Confirm channel's recording schedule is enable. 

    - Check if the channel is on correct recording schedule.

3. Double Check Storage Setting

    - Make sure all channel are assigned to record on its HDD group when the Storage setting is under Group Mode. 

4. Perform Database Rebuild locally. 

    • Some version above support Database Rebuild via web access - K51 and K72

    • Perform Database Rebuild regardless if system is having any database issue symptom. 

    • Database Rebuild process is average ~30 to 60min per TB. The process may still varies depends recording data.

    • After Database Rebuild - Check log to confirm Database Rebuild has went thru properly. 

    • If Database Rebuild Started and Stopped log has been log only within few minutes. Database rebuild may not has been completed properly. It is strongly recommend performing the Database Rebuild again.

    • To check log > System > Log > Information > Database Rebuild Started and Stopped.

    • If the log option is not available - access system via SSH can also obtain similar result.

5. Recording Data is still missing after database rebuild process. 

If the data has not been recorded or has been overwritten, Database rebuild process is not able retrieve those lost data. Have the system upgraded to the latest available firmware version above to prevent any future data lost is strongly recommended for all application.


In light of the global semiconductor shortage, Hikvision has made some hardware changes to the DS-76xxNI-Q1(2)/P NVRs, also known as “Q series.”


These changes do not have any effect on the performance, specifications, or the user interface of the NVRs. For the ease of reference, these modified units are known as “C-Version” units. This is clearly indicated on the NVR label and on the box by the serial number.


The only difference between the “C-Version” and “non-C-Version” is the firmware. The firmware is not interchangeable:


  • The C-Version NVRs must use firmware version v4.31.102 or higher.
  • The non-C-Version (Q series) NVRs must use firmware version v4.30.085 or older.


Please do not be alarmed if a “Firmware Mismatch” message pops up on the screen during the firmware upgrade. This simply means that the firmware does not match the NVR’s hardware. Simply download the correct firmware and the upgrade will go through without any issue.

In light of the global semiconductor shortage, Hikvision has made some hardware changes to the Value Express Series NVRs

These changes do not have any effect on the performance and specification of the recorders. For ease of reference, these modified units are known as “C-Version” units. This is clearly indicated on the NVR label and on the box by the serial number.

The only difference between the “C-Version” and “non-C-Version” is the firmware. The firmware is not interchangeable:

  • The C-Version NVRs must use firmware version v4.30.216 or higher.
  • The non-C-Version (Q series) NVRs must use firmware version v3.4.104 or older.

Please do not be alarmed if a “Firmware Mismatch” message pops up on the screen during the firmware upgrade. This simply means that the firmware does not match the NVR’s hardware. Simply download the correct firmware and the upgrade will go through without any issue.

By downloading and using software and other materials available via this website, you agree to be legally bound by HIKVISION General Terms of Use . If you don’t agree to these terms, you may not download or use any of those materials.

If you are agreeing on behalf of your company, you represent and warrant that you have legal authority to bind your company to the General Terms of Use above. Also you represent and warrant that you are of the legal age of majority in the jurisdiction in which you reside (at least 18 years of age in many countries).